Monday, June 30, 2014

Newborn Glamour! Diva in Training~ Stylized Photosession

Hello Dolls!

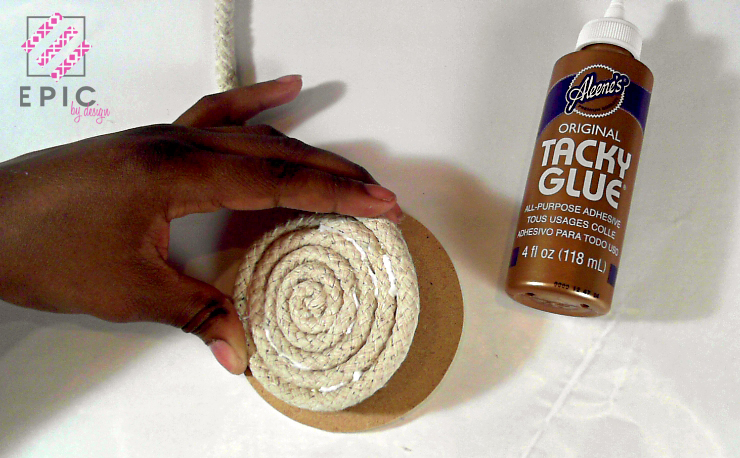
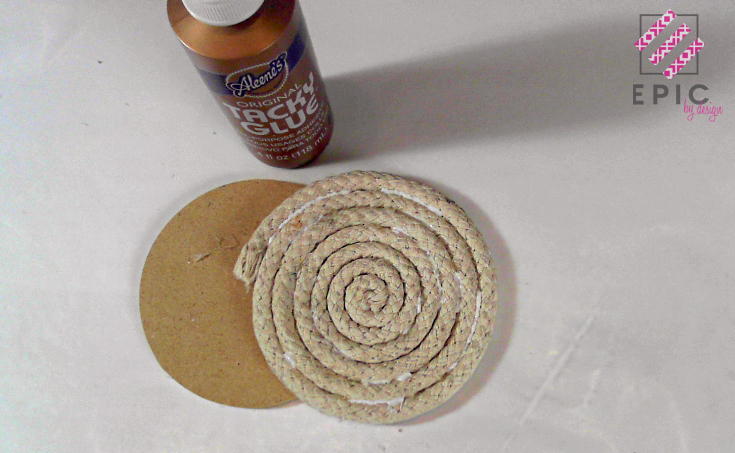
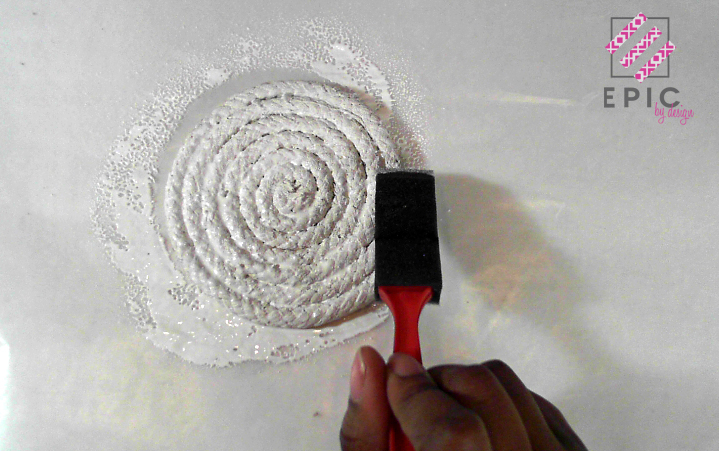
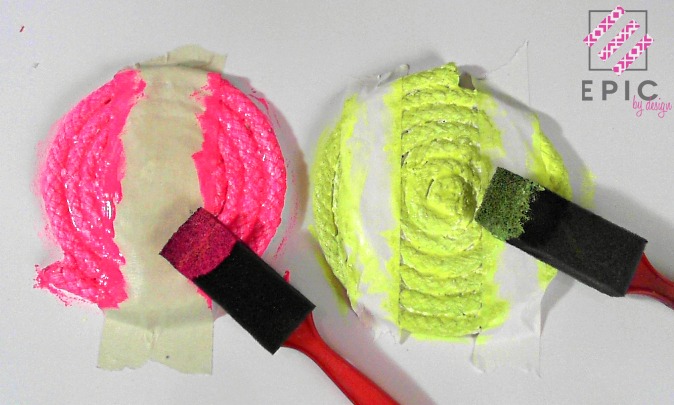
So today is the day I will reveal the newborn glamour stylized photo session I photographed and styled a couple of weeks ago.  In my last post I shared some sneak peeks of some of the props and custom items I made for the shoot, now here is how I used those props. Happy Viewing!

Introducing the Diva of the hour Ava!  Okay so she's not quite a "newborn" per say, however this little bundle of joy was a few months premature so she still quite "newborn size" so we can get away with calling her a "newborn"...lol  Her mother has not had the chance to get pictures taken and birth announcements sent out so we were able to kill two birds with one stone in the above photo.  The concept of this shoot was to use fun props to display all of her birth information from the day and time she was born, to her weight and length.  I wanted the feel of this shoot to show that Ms. Ava is the ultimate girly girl, and diva in training so I added some heels, make-up, pearls and of course she had to have a custom made petti-tutu, headband and matching barefoot sandals. (made by yours truly).  I think this fun birth announcement matched her personality to a T!  As soon as we dressed her she was ready for her close up. She knew to look at the camera and she was even posing for me.  She is definitely not shy in front of the camera. This photo would not have been complete without the Coco Chanel quote: " A girl should be two things: Classy & Fabulous! And Ava is BOTH!
In this photo I wanted it to have more of an Old Hollywood Glamour feel to it.  By the time we set up this particular set she had fallen asleep so we laid her down onto the Victoria Secret gift box and she had posed herself...lol She is a natural!

I would like to take this time to thank my sponsor Wholeport for providing me with beautiful laces, they were the perfect touch to the headband and barefoot sandals. I will be showing more projects using their laces soon.

Thank you so much for spending part of your day with me.  I have a fun maternity shoot coming up and I will share sneak peeks of the props just to get you excited about the reveal. And in case you were wondering YES! it is a stylized session. (That is my specialty).  Ta Ta!

Muah!


Friday, June 27, 2014

My Love-Hate Relationship with Photography + Sneak Peeks

Hello DIY Divas!

So today I wanted to share with you guys a hidden passion of mine that has laid dormant for about 6 years now.  I have always been into the arts, and God has definitely blessed me with artistic abilities.  Most tasks that involve anything art related I will (most likely) excel at it.  You have seen me craft, bake, paint, and design but my first love has always been Photography.  I fell in love with this art form at a young age while browsing through pages of fashion and music magazines.  The day I decided I would be a photographer I was 11 years old, reading Word Up! Magazine and looking at a horrible picture of Lil Kim...lol  that day I vowed that I would be a fashion and/or editorial photographer. From that day forward I would tear out magazine pages and advertisements that inspired me and kept them in a photo inspiration binder.  Upon graduating from High School I enrolled at the Art Institute of Atlanta and graduated with a degree in photography.  Those years and the years after where the best years of my photography career. I had the opportunity to intern for W Magazine in NYC  and be a photography assistant to a celebrity photographer in Atlanta. I had so many fun freelance gigs that always involved hair, makeup, and fashion.  Then an unfortunate event led me back home to Oklahoma (where there is no fashion gigs whatsoever) there were a few models here and there but fun gigs were few and far between and my love for the art form just fizzled. I packed my camera, lighting equipment, and passion in a bag and stored it away.  Years pass and every once in a while my love for photography would try to bubble up but I would try my darnedest to suppress it.  Up until a month ago I did everything I could do not to let my passion and love for this art form bubble up to the surface.  Its funny because I've always wanted to make unique props and style photosessions. (that was my way of being apart of photography without actually being the photographer). So after numerous attempts to collab with local photographers and none of them actually coming through. I decided to go into my attic dust off my camera and lighting equipment and do it myself. As soon as I seen my old camera the sparks started flying, heart starting racing, and I felt butterflies in my stomach. Love at first sight!  This feeling was undeniable! I gave up the battle of suppressing my love and I chose to embrace it.  So today I am announcing that I am going to fulfill my long time dream of being a fashion and editorial photographer but with a different twist. You will have to stay tuned to see what I have up my sleeve. (wink)

In the meantime check out a sneak peek of my latest stylized shoot of a beautiful Diva in training- Ava.  I really wanted to portray Newborn Glamour. I had so much fun gathering materials, creating props, and styling for this session.

Glitter, lace and pearls! A great mixture for a Diva in Training.

I used my cameo silhouette to cut out the letters of Ava's name using glitter card stock, I also used it to cut out the Coco Chanel logo and numbers on the clock. In the very corner (you can't really see it..lol) my niece helped me make a DIY yard stick in the color pink with glitter. This session would not have been complete with out some make-up, heels and pearls.


I created this lovely headband and matching barefoot sandals using one of my favorite black lace eyelet trims from Wholeport.
1 inch black lace eyelet trim from Wholeport
Stay tuned until Monday, June 30 and I will share with you a couple of photos from this Diva In Training photo session.

Muah!


Monday, May 5, 2014

It's My Birthday! 31 Years Young

Hola mis amigos!

Today is Cinco De Mayo! and it just so happens to be my 31st birthday, and I have never felt so alive!
The last year and a half has been very challenging at times, having a failed marriage and going from being a stay at home mom and being thrust into single mommihood (with a 4 month old) in the middle of recovering from postpartum. This indeed was a very dark moment in time for me.  But through it all I have grown into the person I am today, which is a confident woman, mother and artist who FINALLY knows who she is and what she wants out of life.  Those dark moments forced me to look  deep within myself and figure out who I TRULY was and embrace ALL OF ME~ including the imperfections.  This journey has taught me a lot about myself and I am grateful for everything I had to go through to get to this point even though I had to let go of some people in the process (including my false identity).  Here a few things I've learned in the last 365 days of my life.

1. It is very important to be in tune with who you really are (not the false you~ the one you want everybody to THINK you are but the REAL, AUTHENTIC YOU).  I believe that everybody at some point in their lives should take the journey down "who am I really?" lane and get down to the nitty gritty of who they are. But I promise once you figure out who you are, then you can live a more solid and successful life, because you will know what you want and will not settle for anything less, cetain things will no longer phase you, and you can walk with boldness and confidence.

2. I've also learned to embrace imperfections.  Instead of living a life ashamed of certain imperfections it is vital to embrace those things you cannot change about your self, or self image. when it comes to the things you can change embrace the imperfections as you are on your course to change it.  Be in love with YOU, it'll be a much happier life if you just accept the things you can not change and know you are still beautiful no matter what. 

3. To thine own self be true!  At the beginning of the year I made this my slogan, because I vowed that I will no longer compromise who I am as a person, mother, artist, entrepreneur, to please others. I will always be true to who I am and what I believe in. I've spent majority of my life trying to make everybody happy, changing things about my self and my art to be accepted by others and that is such a miserable life to live. Break free from others perceptions of you and live the life that makes YOU happy.  BE YOU. STAY TRUE!

With that being said I am embracing 31 and I vow to make the next 365 days a successful one!  Love you all and thank you for spending a portion of your day with me

Muah!


Friday, May 2, 2014

A Pleasent Surprise

Hello Dolls!

I wanted to share with you all what happened to me while I was at Hobby Lobby yesterday.  I, along with a couple other crafty people, were at Hobby Lobby to get some items to decorate for our church's Mothers Day brunch. So after we gathered all of our materials and were ready to check out (this almost never happens) I was drawn to the Stamping, Stationery, & Scrapbooking Magazine, so I grab it to browse through it (totally not knowing why I even picked it up because I was supposed to be paying attention to the lady checking us out) and I opened it up and lo and behold there were some of the projects I created for Hobby Lobby while I was designing for them in the magazine.


 The funny part is I just opened it to a random page and it landed on the page with my projects on it...lol The universe was trying to tell me something because I never just pick up magazines and read it while the cashier is ringing up my stuff, and then for it to land on that page as soon a I open it... creepy right!?  Well needless to say I was all kinds of excited to see my work in that particular issue of the magazine (although I do have some personal work that will be published in their July issue)  so that was totally unexpected.  These projects are also featured on the end cap sign in the scrapbooking department of Hobby Lobby where the bling is.

So I thought since I'm sharing this article I might as well share with you some of my other work that is featured in their crafty aisles. 

This is an end cap sign in the scrapbooking section where the burlap supplies are

This is an end cap sign in the scrapbooking section where all the Paper Studio flowers are
This is a project sheet that is not released in all stores yet. Not sure where  this one will be located.

This is a project sheet located in the unfinished wood section next to the crosses. To see the full project sheet click here

This is a project sheet located in the scrapbooking section where the printer trays are. To see the full project sheet click here


I hope you guys always think of me when you go into Hobby Lobby and see my work.  Be sure to grab you some of those inspiration sheets if you see them, and if anyone is interested in picking up a copy of the issue it is located by the registers and is only $1.99 (can't beat that)  and for you penny pinchers (lol) you can use your 40% off coupon to purchase it.

Thank you so much for sharing a part of your day with me. See you on the flip side!

Muah!

Wednesday, April 30, 2014

DIY: Color Blocked Rope Coasters

So now that Old Lady Winter has finally accepted defeat- although she did not give up her reign without a fight. It is now time for spring to pull out her most fashionable clothing and show us what she’s working with, and you best believe she is struttin’ her stuff and giving us full bloom. It’s that kind of weather that makes you wanna call up your girls, make a couple cocktails- or maybe some freshly squeezed lemonade (wink)- and chill out on the porch. If you do decide to “live life on the edge” (lol) I’ve got a quick and easy DIY that will make even your lemonade glass feel delighted.
These color blocked rope coasters scream “spring fashion & the great outdoors”, and are a must try.
 
Here are the supplies you’ll need:
Now Let's begin.
 
2014-04-28 00-09-56.887
So to start you will need your rope, your round template, and some Aileene's Tacky Glue. The round template will be used as a guide for sizing and as a flat surface to coil the rope on. If you hold it in your hands to coil it, it will not lay flat once you're finished. Be sure to keep this in mind.
2014-04-28 00-11-14.843
Next you will need to apply some Tacky Glue about a half inch away from the top of the rope.
2014-04-28 00-11-55.006
Now coil the top part of the rope tightly and press it firmly against the glue. (You will need to hold it for a few seconds to make sure that it does not come undone... To speed up the process I ran my heat tool (blow dryer will work too) on it to make it dry a little faster).
 
2014-04-28 00-21-09.626
Continue tightly and firmly coiling the rope. Add Tacky Glue every half inch. Do not worry if the glue presses to the top, it will dry clear and plus you will be painting over it so it will not be visible.
2014-04-28 00-29-19.196
Once you get to the end of your rope (pun intended...lol) be sure to apply some Tacky Glue to the end of it so that it will not unravel.
2014-04-28 00-30-31.813
Wait for it to completely dry and then snip off a small piece of the end so that its straight
2014-04-28 00-21-37.955
Now glue the end piece down and wait for it to dry completely before moving on to the next step.
2014-04-28 00-26-55.090
This is what it should look like (as you can see the glue is still a little wet in this photo)
2014-04-28 00-35-27.914
Now that your coaster is dry it's time to apply some color. I want my base to be white so I am applying some Tulip Fabric Spray.
2014-04-28 00-35-38.737
Be sure to get into the groove (literally..lol) I found that using a sponge brush was easiest to get the paint in to the grooves of the rope.
2014-04-28 00-55-14.142
Once its completely dry, this is what it should look like.
2014-04-28 01-20-08.339
Now its color blocking time! Add some masking tape in your desired pattern. This will help you get clean crisp lines. You can get creative with the patterns. I chose to keep it simple. I am using Americana Mulit-Surface Paints in Neon Yellow and Neon Pink
2014-04-28 01-25-35.489
Once you have applied your color wait for it to dry completely before removing the masking tape.
2014-04-28 01-41-39.765
This is how it should look once you've removed the tape.
 
Now you have a fun and colorful coaster set that will coincide greatly with all of your outdoor gatherings. I do hope you give these a try. If you do be sure to share your projects with me on my Facebook page, and hashtag #MadameRoTV.
For all you DIYers who are more visual learners I have a video tutorial for you all to watch. Happy viewing!
 
If you enjoyed this video tutorial and are interested in seeing future tutorials be sure to hit that subscribe button. Also check out past tutorials via my "Tutorials" tab.

Thank you for joining me today.

 Muah!

DIY Colorful Applique Earrings: Earrings That Make A Statement

Hello DIY Divas
Today I have a super fun tutorial to share with you all. Many of my followers know that Madame Ro is very over the top. I love to make a statement! Whether it be my hair, clothing, or jewelry, I can never leave the house without some form of "WOW-factor". So I created these snazzy over the top earrings using some appliques.
I couldn't just stop there I wanted to take all the boringness out of them so I grabbed my Americana Multi-surface paints in the neon collection, got a hard bristle paint brush, and splattered away. I absolutely love the way that these turned out and every time I wear them out they get more attention then I do ( I'm so jealous...wink) lol.
So without further adieu here is the tutorial. Happy viewing!


I certainly hope that you were inspired to go out and create a stunning pair of applique earrings. For more information about the Americana Multi-Surface paints check out the DecoArt website.

As always thank you for spending a moment of your day with me.


Muah!

blog signature

Sometimes Change is a Good Thing!

Hello my crafty friends.

I know its been a while since I've last greeted you all.  I have been on hiatus trying to get some things in my life in order. During my break I was able to get focused and map out a clear plan for my life.  With that being said as you can see things are looking mighty different around here...lol If you are wondering where a lot of my blog posts went, I have nixed them and kept only the tutorials. I am also making changes to my Facebook page and YouTube channel as well. While I was clearing the clutter on this blog I somehow deleted the photo files and I am working diligently to get the photos back up, so bare with me as this is a long process...lol.

I decided that I am going to get serious about my brand and start blogging/vlogging on a more professional level. So I am gearing my brand towards the DIY connoisseurs . As much as I love all of my crafty friends and my mixed media mavens I must follow my heart and go with what makes me happy which is to inspire people to create.  So the next chapter of Madame Ro will be focused more on doing tutorials to inspire people to customize their lives through DIY.  I am still addicted to mixed media so I will throw in some mixed media flair on occasion.

I would like to introduce to you my new brand that will coincide with the Madame Ro the Artist brand: EPIC by design.

EPIC stands for Embracing Passion. Inspiring Creativity

In today’s economy people are looking for ways to cut costs.  But cutting costs does not mean we have to miss out on the hottest new trends, it simply means we have to get creative and find a way to recreate the trends on a budget that our wallets would be proud of. The DIY movement has taken off with explosive force, thanks to sites like Pinterest & YouTube people are becoming more and more inspired to create on their own terms. Anyone can become an artist!
EPIC by design’s mantra is Embracing Passion. Inspiring Creativity so the goal of this brand is to inspire you to embrace your inner DIY Diva. Weather you are a seasoned DIY-er or a DIY wanna be, I will get your creative DIY juices flowing so you can get out there and start creating YOUR way! #BeEPIC

I hope that you all continue on this new journey with me.  Here is the link to my new Facebook Fan page be sure to follow me there. I have also added a new tab so you can easily browse through my tutorials via the "Tutorials" tab. Feel free to check them out.

Thanks for sharing your time with me today.

Muah!